Alphabet Magnets

2014_fridge

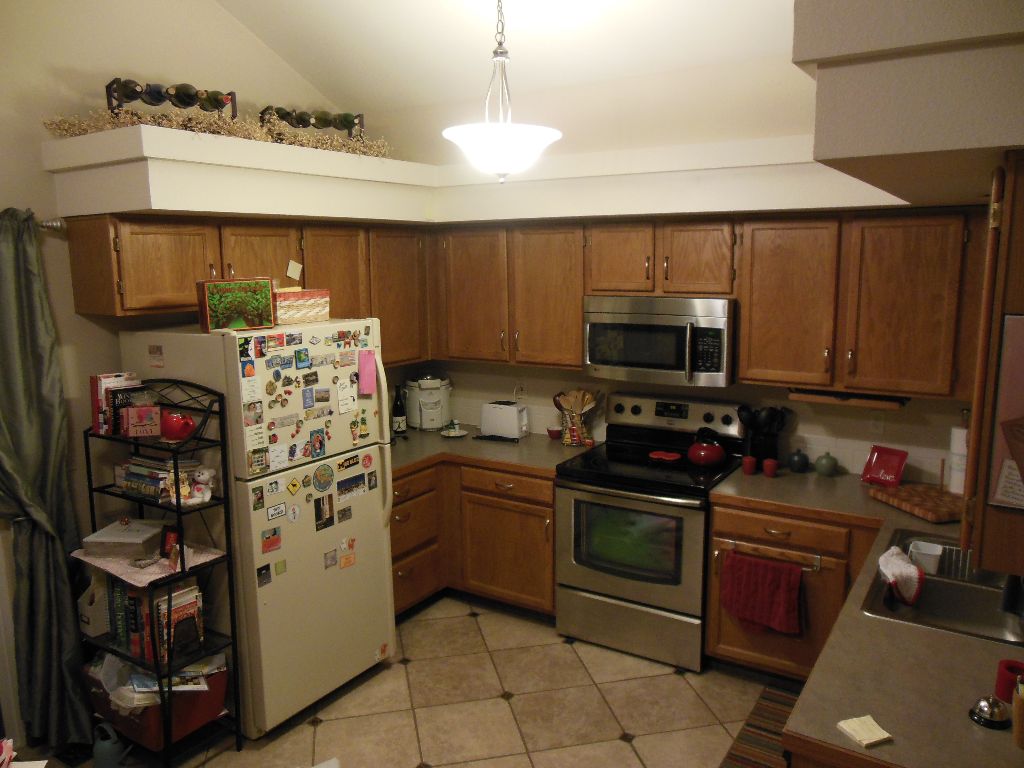
Fridge at my previous house — lots of magnets!

Anyone who has been to my house knows that I love refrigerator magnets! My magnet collection is quite extensive — I have magnets from various countries we’ve visited, theme parks (mostly Disney ones!), broadway shows (e.g., Les Miserables, Wicked), National Parks, favorite restaurants, quotes, bottle caps, and so on. I also have a set of magnetic poetry and two sets of alphabet and number magnets.

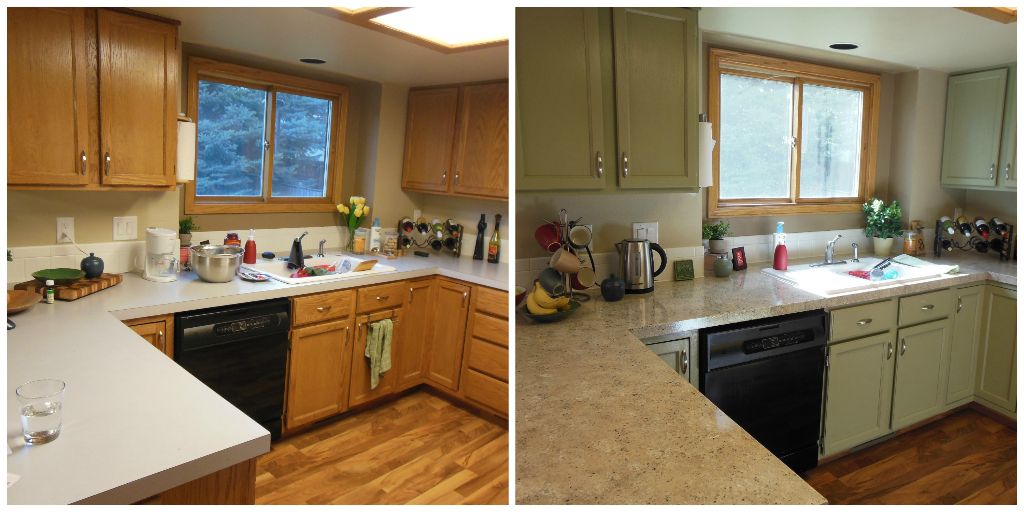
At my old house my fridge (right) was pretty much covered in magnets. This was entertaining for me, but let’s be honest – it was pretty cluttered…

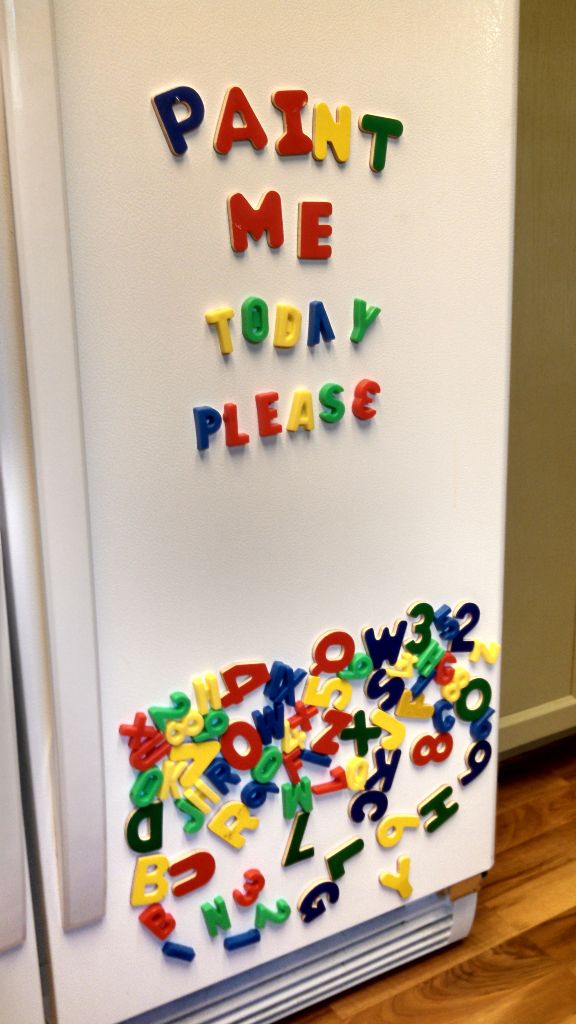
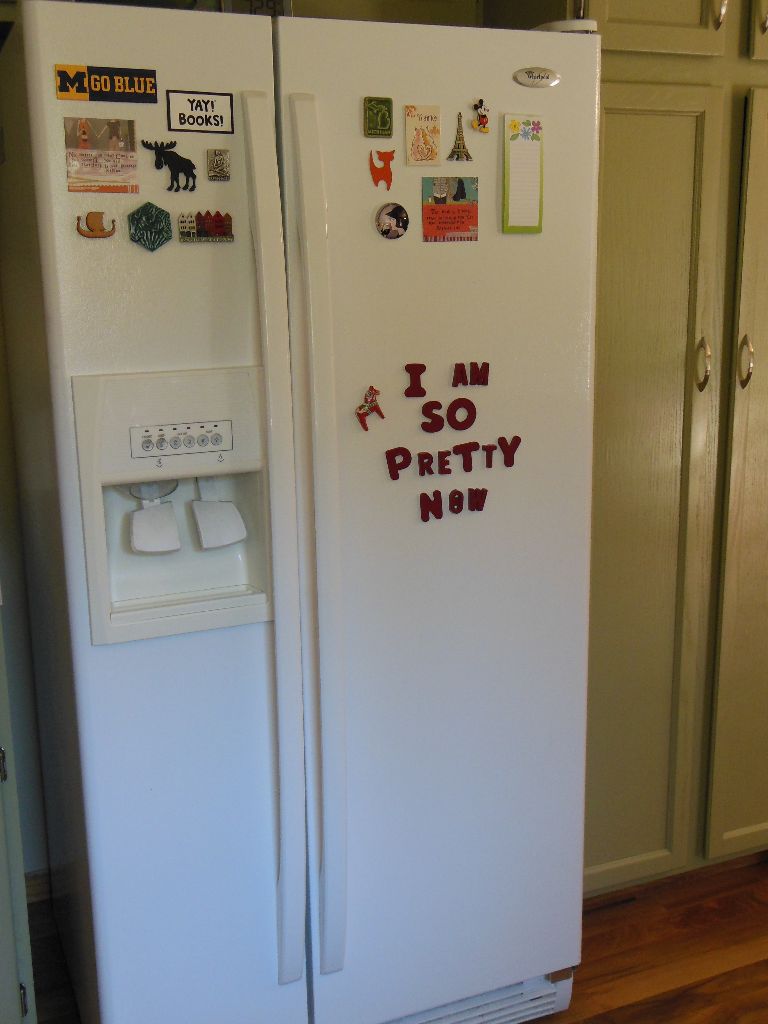
At my new house I have tried to keep my fridge a little more refined by only displaying some magnets at a time and rotating through my collection. Due to this attempt to be a little more grown up, since we moved in I have hardly used my alphabet magnets because they seem so wild on the fridge with all of their different colors. But having the alphabet around is so fun! So when I saw a pin on pinterest about painting alphabet magnets, I knew it was something I needed to do!

AlphabetMagentsBefore

I decided to paint my two sets of alphabet magnets red! I use red as a fun accent color in my green and beige kitchen, so I thought it was the perfect choice. Matt had also requested a “fun” color! I picked up a can of plastic friendly, red, glossy spray paint and I got to work.

I was concerned about if the magnets would stick to whatever surface I painted them on, so I put them on a sheet of wax paper to paint them. This worked very well. The paint did get all over the wax paper, but the magnets just lifted right off the wax paper! I did a couple coats of paint… it was hard to get in a few of the small corners, so I moved around a lot when painting to try to get at those spots from different angles. I’m sure my paint job isn’t perfect, but they look good enough for me!

PaintingMagnets
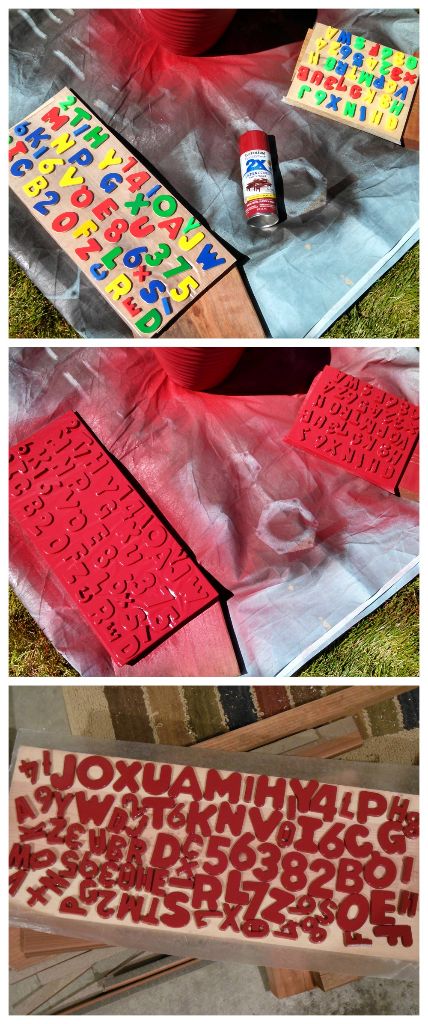
Painting them only took a few minutes and was pretty easy. Probably the hardest thing was laying them out before painting them! Also, I had been painting some other things too, so by the time I got around to the magnets, my right arm was actually shaking a little bit from all of the (oh-so-very) hard work of spray painting..! But aside from that, this really was a very simple project!

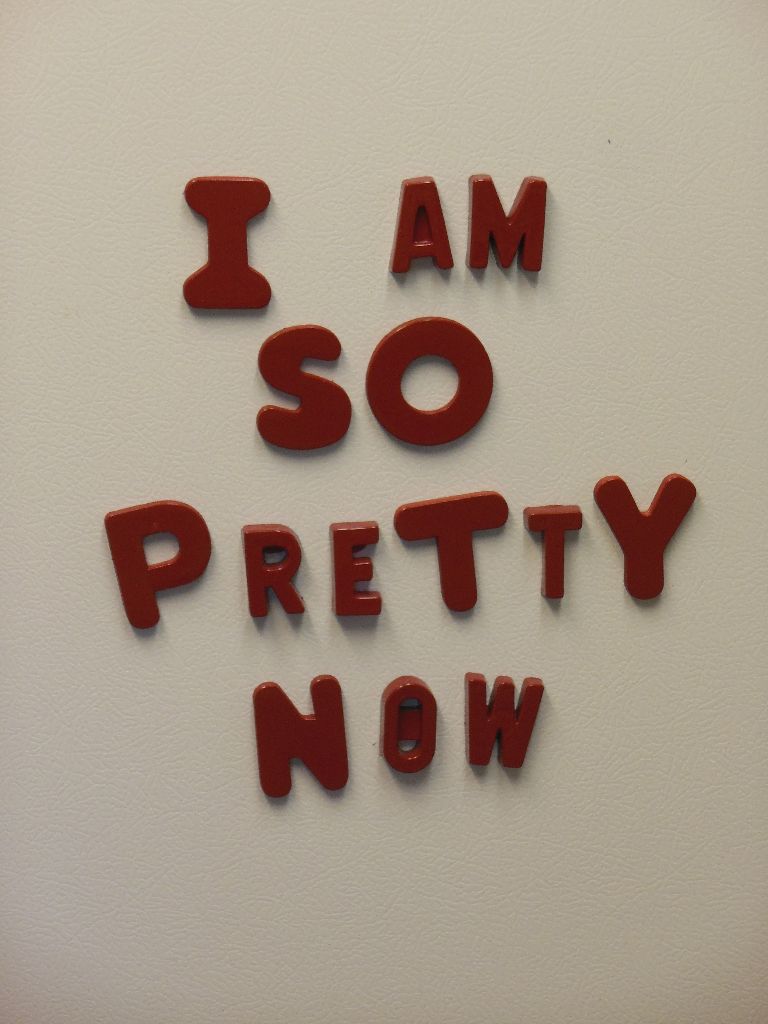
Now the magnets are finished and they are so happy to be back in my kitchen ready to be used!

PaintedAlphabetMagnets

PaintedMagnets

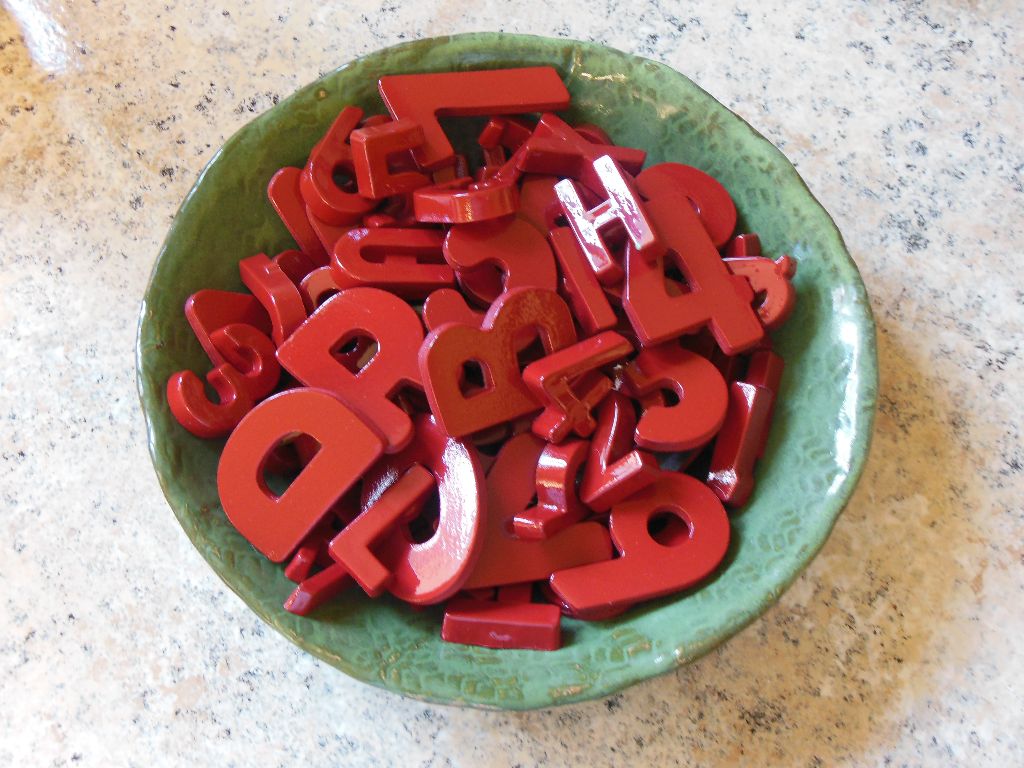
I also decided that when not in use, extra letters and numbers should live in a bowl somewhere in the kitchen instead of the front of the fridge itself. My mom does this and I think it helps to contain the cluttered look quite a bit! Thanks for the inspiration, Mom!

DSCN7648

Now, what fun messages should I spell out on the fridge today?!

Literary Sign Post

LiterarySignPost

I love reading. I also love my little slice of paradise (a.k.a. my yard & garden). So when my mom found this literary sign post on pinterest, I just knew I had to have one of my own to bring some of my literary worlds into my garden!

I ran the idea past Matt and he really liked it too. He’s not always on board with helping with my crafts, but he was excited about this one and even helped me pick out some of the locations to put on the signs! ;-)

The Wood

First we got the signs ready to paint. Earlier this summer Matt tore down the old dog run in our backyard from the previous owners, so we had a pile of aged wood and he also had some scraps in the garage. I picked out a few pieces and had him cut them down into points. He also had fun ideas to give some tails and to make one look like an arrow!

SignCollageBefore

Carbon PaperLettering & Painting

The problem was how to get the lettering on the signs. Stencils? Freehand? I wanted to use a variety of fonts and sizes and I was stumped on how to do it and be time-effective. Mom came up with the brilliant idea of printing the letters out from the computer and then using carbon paper to trace and transfer the outline of the letters! I found carbon paper at Office Max for about $7 for a pack of 12 sheets. Score.

Next, we painted! While the guys were working on my amazing deck and pergola, my mom, my sister-in-law Jillyn, and I worked on my literary signs! Mom handled the lettering and carbon paper and Jillyn and I did most of the painting.  Here are my helpers! Thanks, ladies! :-)

Sign post - in progress

The carbon paper worked perfectly on all but 2 of the signs — they were too dark and rough to handle the carbon transfer. On those two, Mom did cut out the letters and then use the paper as a stencil, but on all the others, the carbon paper worked like a charm. I had never crafted with carbon paper before, but I think I will probably find uses for it in the future now that I know how awesome it is.

SignPost&MattFinal Touches

Once all the signs were painted, Matt sprayed them all with a few coats of polyurethane from Home Depot to keep them protected in our harsh Colorado sun and weather! Then we put the post up in the garden and screwed on the signs.

I LOVE it! It’s just the cutest thing in my backyard!

LiterarySignPostDo you recognize all of the locations?!

Painting Our Kitchen Cabinets

We painted our kitchen cabinets! “Gee, that a lot of work,” you’re thinking. And you’re absolutely right. It was a lot of work. But definitely worth it! See how awesome it looks?

Kitchen_before&after2 (Our countertops have also been resurfaced… more on that soon!)

Our cabinets were just your regular oak cabinets, the same in probably every house in our neighborhood. And our old neighborhood. And probably many neighborhoods across the city. And they weren’t in great shape, so we didn’t feel bad painting them!

We taped off the kitchen to contain the mess and keep the kitties out. The cats were NOT happy about being excluded from the action.

We taped off the kitchen to contain the mess and keep the kitties out. The cats were NOT happy about being excluded from the action.

We followed the steps on how to paint kitchen cabinets from Better Homes and Gardens. They have some good instructions there and a materials check list that was pretty helpful. It definitely got us started. We also talked to some paint people at our paint store to get their opinions on paint and tools that we would need.

In case you are thinking of painting your cabinets, here are a few of our thoughts and lessons learned:

  1. The TSP was pretty impressive. Our house is 23 years old, so our cabinetry had some seriously sticky/gross spots from the previous owners that hadn’t come off for me with dawn or wood cleaner. The TSP took care of most of those bad spots! We definitely recommend using TSP.
  2. We used Matt’s power sander where possible, but we realized too late that not all of the doors had been sanded equally. Definitely don’t skimp on your sanding or your sand paper. We realized after the first coat of paint/primer that some of the doors hadn’t been sanded very well and they ended up being harder to cover well. The paint didn’t want to go into the areas with deep wood grain. As a result, we brushed a coat on the front of the doors, when we’d hoped to only have to spray.  Speaking of spraying…
  3. cabinets - sprayingOn the doors and drawers, we used our awesome paint sprayer and it was amazing. It left such a nice even coat, with no brush or roller marks, and it was really fast.  The exception of course is the coat we brushed by hand because of the sanding/wood grain problem. But we still sprayed a coat of paint over the brushed coat because it looked so much better.
  4. On the cabinets bases left in the kitchen we brushed and used a small 3 inch roller. After the primer coat we learned that the brush left marks, and on the second coat we rolled where ever possible and brushed in just corners and tight edges.cabinets - hanging system
  5. Matt built an awesome hanging system that allowed us to paint all sides of the doors at one time. He left two screws in each door from the holes for the hinges and tied a piece of fishing line to the screws. Then he used mug hooks screwed into a big piece of plywood to hang all doors. Because we could move the doors around by the fishing line and hang them to dry by the fishing line, we were able to paint the entire door at one time, then hang it up to dry. He built a painting tent where we hung one door at a time, painted it, flipped it over, and painted the other side. Then we moved the wet door to the hanging system and retrieved the next one in line for painting. We didn’t have to wait for side one to dry before flipping over and painting side two. With over 20 doors in the kitchen it still took us a lot of time, but being able to paint the front and back together made it go faster!

Kitchen_before&after1Once we were done painting the cabinets we had to do something about the counter tops because now they looked seriously bad. For our next project, we resurfaced our counter tops!

Thoughts on Our Popcorn Ceiling Removal

So… it’s been a while since I’ve blogged about anything! Let’s just say that between starting my own business, Blythe Styles, buying a new house, selling our old one, moving, and spending a month in Europe, I’ve had a fairly busy 2014! But now that things are settling down, it’s time I report on some of our projects from this year! First up are some thoughts on our popcorn ceiling removal.

The house we bought this year had popcorn ceilings. If you don’t know what this is, you are lucky! But assuming you know what popcorn ceilings are, you will be glad to know that we had them removed! Here are before/during/after pictures of our entry way:

EntrywayCeilingCollageBefore: In the picture on the left, you can see the crazy amount of popcorn texture that the ceilings in the house originally had. I was so anxious to get rid of them!

During: In the center picture, you can see the texture has been scraped off. Next it needed to be re-textured (a light orange peel) and painted.

After: In the picture on the right, you can see the finished product (and a new light fixture). The ceiling is so smooth now, and instead of sucking light out of the space, it spreads the light nicely. :-)

We had read about popcorn removal online and decided that this was a project we wanted to hire out. Basically you need to get the texture wet, scrape it off, re-texture the ceiling, and paint it. Matt and I are big “do it yourselfers”, but this project was going to be really messy and time consuming. So we hired it out, and I’m SO glad we did. In the end, our house now feels cleaner and lighter, and we are so happy with our “new” ceilings. It is the best thing we’ve done for the house so far.

For anyone considering removing popcorn ceilings, here are some of our thoughts on the project:

  1. Popcorn MessPopcorn ceiling removal is MESSY. I am not kidding. Be prepared for a big mess. On the right is a picture of some of the popcorn on the floor after it was scraped off. Now imagine this all over. And on your shoes. And everywhere you walk in those shoes for the next week. Our entire house was covered in drywall dust. The guys did a fairly good job of taping things off and using plastic sheets to cover the floors, but it still got everywhere. If at all possible, do this type of ceiling work in a vacant home. If that’s not possible, I would suggest vacating affected spaces as much as possible, covering what’s left really, really well, and taping off unaffected spaces as best as you can. It is so messy.
  2. Hire it out and understand the quotes. I was so horrified at the popcorn ceilings that they were the first item on our list of things to change after closing on the house. We wanted the ceiling work to be done by the time we moved in (that gave us 3 weeks). We’d already agreed to hire it out, so we got a few quotes as soon as possible and selected the team. We thought we had done our homework and knew what we were getting into, but we didn’t. We realized too late into the project that this particular team’s quote didn’t include painting. Lesson learned. Always make sure you know exactly what the quote covers. We decided we’d already spent enough money on the ceilings, so we ended up having to paint the ceilings ourselves, and it was a LOT of work. We spent HOURS painting ceilings at this house. We were really disappointed and felt pretty stupid… So know what the team is going to do. We assumed too much.
  3. Jenna with roller extension poleIf you end up the painting ceilings like we did, definitely get an extension for your roller or a paint sprayer. We bought a paint sprayer for a different project after the ceilings were already done, and Matt was kicking himself for not buying one sooner because it could have saved us a bunch of time. If you don’t want to splurge on a paint sprayer, at least get an extension pole for your rollers. This was a suggestion from my dad, and it was fantastic. We loved having the extension on the roller. (That’s me on the right with my roller and extension pole! Don’t you love the scaffolding too? We’re awesome.) Oh, and wear eye protection too. Matt always wears glasses so he was already covered (pun intended), but I usually wear contacts. I learned the hard way that painting ceilings WILL get paint in your eyes. And it hurts. So I wore my awesome blue safety glasses to protect my eyes after that first (painful) day.
  4. If you can, see samples of their work. We were in such a rush to get the ceilings fixed before we had to move in, that we selected our team really quickly. Probably too quickly. You learned above that the guys we picked didn’t paint… We also didn’t ask to see samples, and although our guys did a pretty good job, they did make a few mistakes. There are a few places where they gouged our ceilings a little bit during the scraping. Matt and I are probably the only ones who will ever notice those spots (they aren’t horrible or anything), but I still wish they weren’t there. If we’d been able to see samples of their work, we might have picked a different team.

In the end though, we are so happy with our ceilings now. They look great and they make the whole house feel so much better. We are so, so glad that we had the ceilings worked on and that we did the work before we moved in!